
Written by Dakshitha
Prerequisites
1) Download and install Carbon Studio (I am using version 1.0.12 in this tutorial)
Contents
1) Create a CApp
2) Create a Web Application Project
3) Create the Web Application
4) Package the Web Application inside a CAR file
5) Deploy the CAR file in Stratos Live

Select Carbon Application Project

Give a name to the project. Give TestProject as the name of the CApp.
2) Create a Web Application Project
Right click on TestProject -> New -> Web Application (WAR)

A wizard will be shown for the creation process of the WAR. Select Web Application from web project as shown. Since we don't have any web projects in the workspace, let's create one from scratch. So click on New Dynamic Web Project.

Give the 'WebApp' as the project name. Click on next.

The following page will be shown. Click on next.

In the next page, the information is given for you. Just click on Finish to finish creating the web project. (The contents for this project will be added later).

When you clicked on 'Finish' you will see the newly-created web application in your workspace and it will be selected in the drop down box. Click on Next.

We need the web application to be contained in the CApp, therefore select TestProject and click on Finish.

You will now have two separate projects in your workspace. WebApp is the dynamic web project and TestProject is the CApp project which refers the WebApp.

For this scenario, the web app will contain one JSP and servlet each. Let's create the JSP first.
Right click on WebApp -> New -> JSP File

Give index.jsp as the name and click on Next.

New JSP File (html) will be the default selection as the JSP template. Click on Finish.

The new index.jsp file is now created inside the 'WebContent' folder.

Overwrite your index.jsp file with the following code and save.
Let's create the servlet for the web app now.
Right click on WebApp -> New -> Servlet

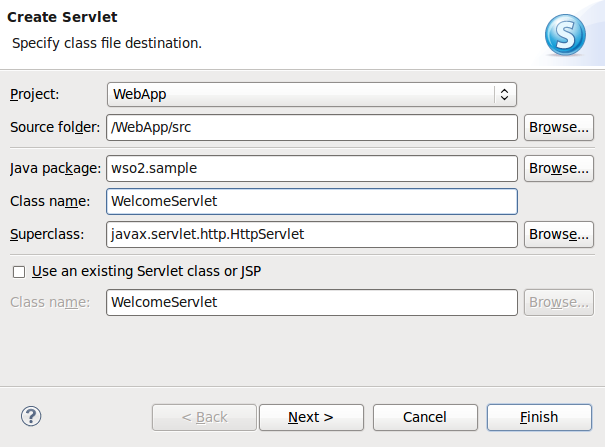
You will now see a wizard. In the first page, Project will be already selected. Source folder is the location of the servlet that we are creating. Give wso2.sample as the package name and WelcomeServlet as the class name as shown below. Click on Next.


Let's now add a URL pattern for the servlet mapping in the web.xml file. The web.xml file can be found in WebApp -> WebContent -> WEB-INF. Replace your web.xml file with the following code. Save the file.
We have now finished creating the web application.

Create and save the CAR file. (Click here for more information on creating CAR files).
Sign-in with your tenant id and password.

When you go to the Stratos Live manager page. Click on Application Server. The Application Server is where the web app will be hosted.

Go to Manage -> Applications -> Add.

Under Add Applications you will be able browse for a CAR file. Choose TestProject-1.0.0.car and upload it as shown.


After the success message is displayed go to Manage -> Web Applications -> List as shown below.


You will be taken to index.jsp page that we created. Enter your name and press the submit button.

Next you will be redirected to the WelcomeServlet.java as shown below.

And that's it :). Our simple web application is now up and running on Stratos Live. Similarly you can host any web application of your choice in Stratos Live.
<%@ page language="java" contentType="text/html; charset=UTF-8"

	pageEncoding="UTF-8"%>

<!DOCTYPE html PUBLIC "-//W3C//DTD HTML 4.01 Transitional//EN" "http://www.w3.org/TR/html4/loose.dtd">

<html>

<head>

<meta http-equiv="Content-Type" content="text/html; charset=UTF-8">

<title></title>

</head>

<body>

<h2>Welcome to the tutorial on how to deploy a Web App in StratosLive!</h2>

<form method="get" action="welcome.jsp">

Enter your name here :

<input type="text" name="name">

<input type="submit" value="Submit"></form>

</body>

</html>
Right click on WebApp -> New -> Servlet

In the next page, add a description. Since this app doesn't require any initialization parameters click on Next. (We'll be adding the URL Mappings in the web.xml later).

Select the method stubs that you want. Click on Finish.

Your servlet is now created inside WebApp/src. However there will be errors because we need to add a library containing the javax.servlet package to the build path of the WebApp project.

To add the required library right click on WebApp -> Build Path -> Configure Build Path.

Click on Add External Jars in the Libraries tab.

Provide the relevant jar file from your local file system. I used servlet-api-5.5.15.jar. Click on OK.

Replace your WelcomeServlet.java with the following code and save.
package wso2.sample;


import java.io.IOException;

import java.io.PrintWriter;


import javax.servlet.ServletException;

import javax.servlet.http.HttpServlet;

import javax.servlet.http.HttpServletRequest;

import javax.servlet.http.HttpServletResponse;


public class WelcomeServlet extends HttpServlet {


	private static final long serialVersionUID = 1L;

	private String userName;


	public void init() throws ServletException {

		userName = "default";

	}


	protected void doGet(HttpServletRequest request,

			HttpServletResponse response) throws ServletException, IOException {

		userName = (String) request.getParameter("name");

		response.setContentType("text/html");

		PrintWriter out = response.getWriter();

		out.println("<h2>" + "<font color=\"blue\">" + "Welcome " + userName

				+ " :) !!" + "</font></h2>");

	}


	protected void doPost(HttpServletRequest req, HttpServletResponse resp)

			throws ServletException, IOException {

		doGet(req, resp);

	}

}
Let's now add a URL pattern for the servlet mapping in the web.xml file. The web.xml file can be found in WebApp -> WebContent -> WEB-INF. Replace your web.xml file with the following code. Save the file.
<?xml version="1.0" encoding="UTF-8"?>

<web-app id="WebApp_ID" version="2.4" xmlns="http://java.sun.com/xml/ns/j2ee" xmlns:xsi="http://www.w3.org/2001/XMLSchema-instance" xsi:schemaLocation="http://java.sun.com/xml/ns/j2ee http://java.sun.com/xml/ns/j2ee/web-app_2_4.xsd">

	<display-name>WebApp</display-name>

	<servlet>

		<description>This servlet prints a welcome message to the user.</description>

		<display-name>WelcomeServlet</display-name>

		<servlet-name>WelcomeServlet</servlet-name>

		<servlet-class>wso2.sample.WelcomeServlet</servlet-class>

	</servlet>

	<servlet-mapping>

		<servlet-name>WelcomeServlet</servlet-name>

		<url-pattern>/welcome.jsp</url-pattern>

	</servlet-mapping>

	<welcome-file-list>

		<welcome-file>index.html</welcome-file>

		<welcome-file>index.htm</welcome-file>

		<welcome-file>index.jsp</welcome-file>

		<welcome-file>default.html</welcome-file>

		<welcome-file>default.htm</welcome-file>

		<welcome-file>default.jsp</welcome-file>

	</welcome-file-list>

</web-app>
4) Package the Web Application inside a CAR file
There are two ways that we can package and deploy the web application. We can simply right click on WebApp -> Export -> WAR file and export the project as a WAR file. However I'll be showing how to package the Web Application as a WAR file within a CAR file.
Go to TestProject (the CApp we created). You will find that a link to the WebApp project is created under artifacts -> carbon-ui -> webapps. Now let's export TestProject as a CAR file. Double click on root-artifact.xml. Select WebApp under Existing Artifacts and click on the Create Archive button on the top right.

Sign-in with your tenant id and password.

When you go to the Stratos Live manager page. Click on Application Server. The Application Server is where the web app will be hosted.

Go to Manage -> Applications -> Add.

Under Add Applications you will be able browse for a CAR file. Choose TestProject-1.0.0.car and upload it as shown.


After the success message is displayed go to Manage -> Web Applications -> List as shown below.

You will see that WebApp is now deployed in the Application Server. To view the application click on Go to URL.

You will be taken to index.jsp page that we created. Enter your name and press the submit button.

Next you will be redirected to the WelcomeServlet.java as shown below.

And that's it :). Our simple web application is now up and running on Stratos Live. Similarly you can host any web application of your choice in Stratos Live.
No comments:
Post a Comment